Go Back
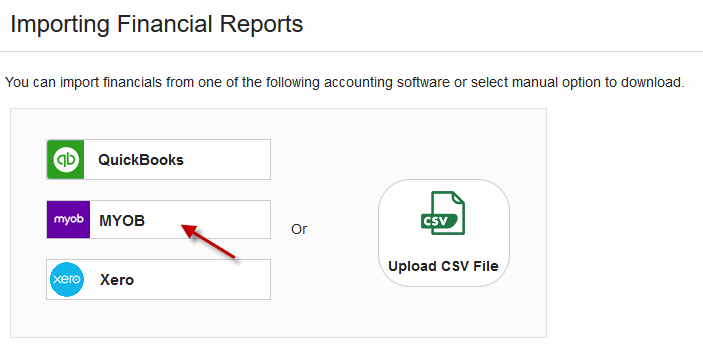
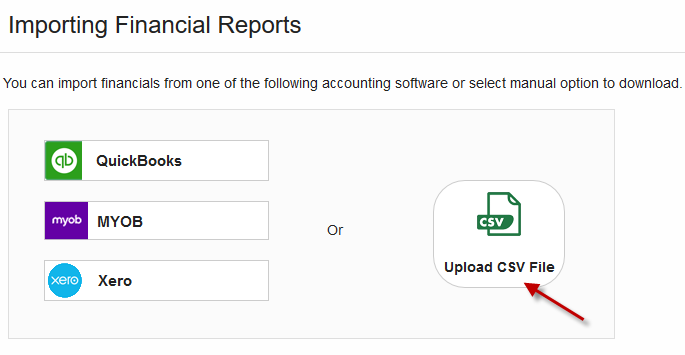
Importing data is the quickest way to get your business started with IAM. GovReports is integrated with other accounting software including MYOB, Xero and QuickBooks to enable direct data import from these accounting software.
2 Options to get you started by either using the import function or manually upload CSV back up files.
What data can be imported from Other Software?
What data can be manually uploaded in Csv Files?
Data Import Function in IAM:
Step 1 : Select data source ie: Other accounting software or Upload Csv file.
Step 2 : Select software import or Upload of CSV
Step 3 : Set the Date and respective Criteria
Step 4 : Connect to selective accounting software or Upload Csv File
Step 5 : Map the chart of accounts
Step 6: Review and Import
1.Import data from Xero:
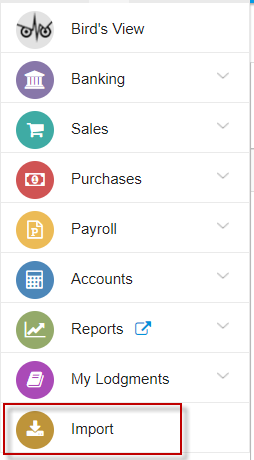
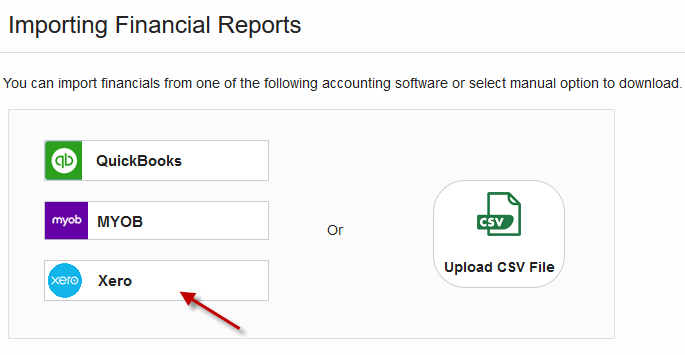
Select “Import” menu.
Click “Xero”
Select data source to import

Set Date and other matching criteria, “Connect to Xero”.

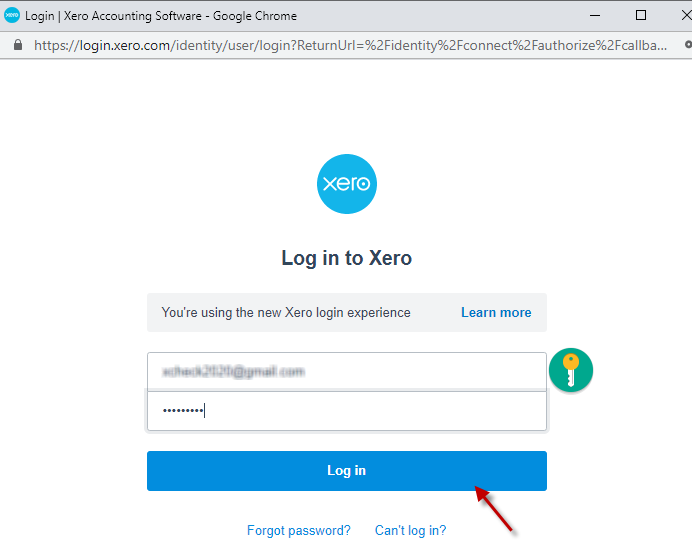
Enter credentials and log in to Xero.
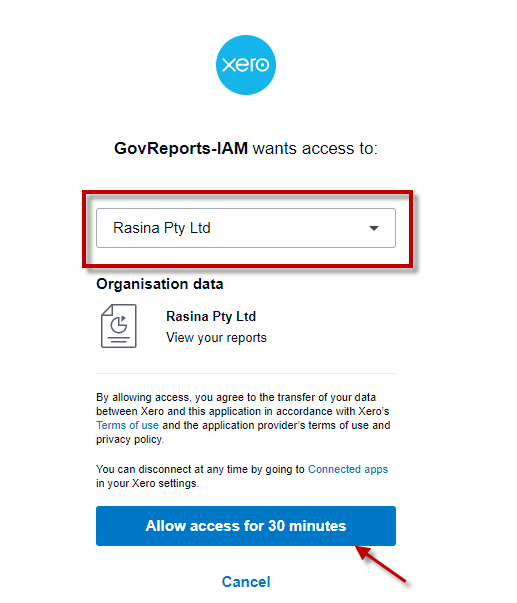
Select Organisation and click “Allow access for 30 minutes”.
Initial chart of accounts set up with mapping of accounts list imported from Xero, mapped data will be saved automatically for subsequent use.
Mandatory accounts in red to be mapped as chart of accounts and unmapped accounts count will be displayed and easily navigated through.
Click “Next” and select the chart of account from the dropdown menu or set up a new account for mapping.

Review details and “Import”.

View the summary and go to opening balances or accounting reports to review the data imported.
Any failed transactions will be listed in the log file of imported summary and reason for failure.
2. Import data from QuickBooks:
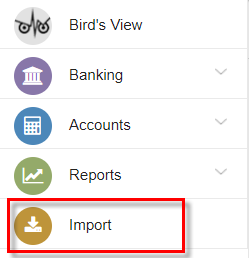
Select “Import” menu
Select “QuickBooks”.

Select Date and other matching criteria & “Connect to QuickBooks”.
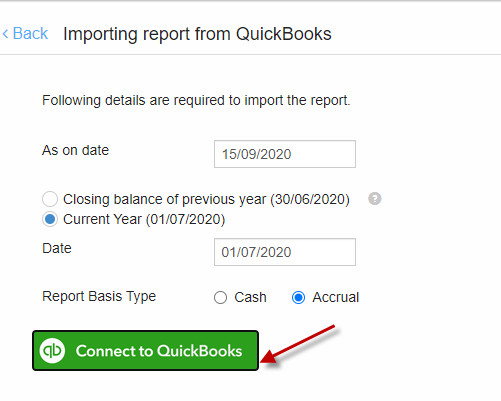
Enter credentials to Sign In to QuickBooks.
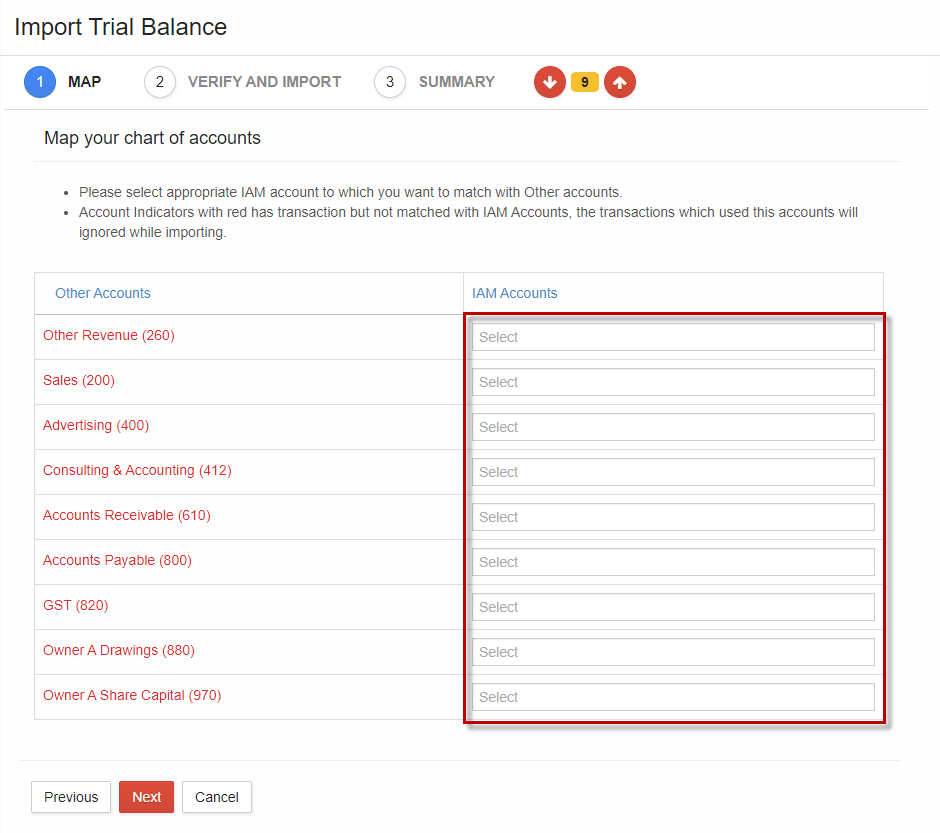
Initial chart of accounts set up with mapping list of accounts to be imported from Quickbooks. When completed, the mappings will be saved automatically for subsequent imports.
Mandatory accounts in red and unmapped accounts can easily be navigated through.
Click “Next” after mapping and select chart of the account from the dropdown or set up a new account for mapping.
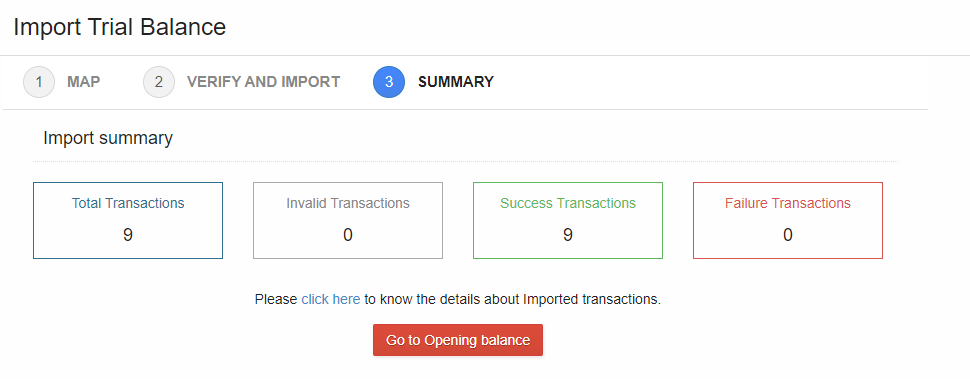
Review details and Import.
View the summary and go to opening balances or accounting reports to review the imported data. Any failed transactions from the log file will be listed and the reason for failure.
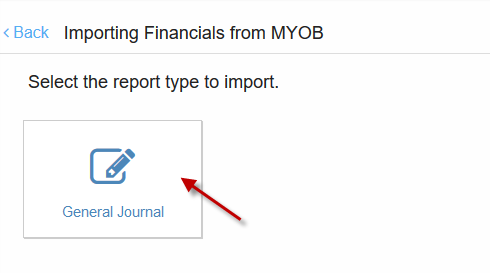
3. Import General Journal from MYOB
Select “Import” menu
Select “MYOB”.
Select “General Journal”
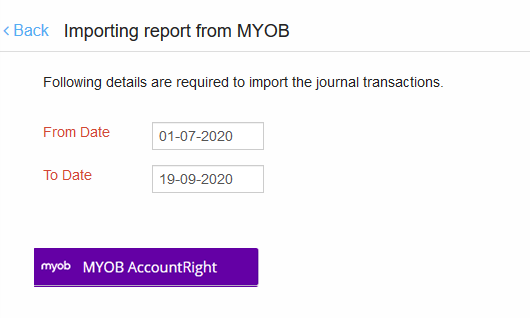
Set the date and click “MYOB AccountRight”.
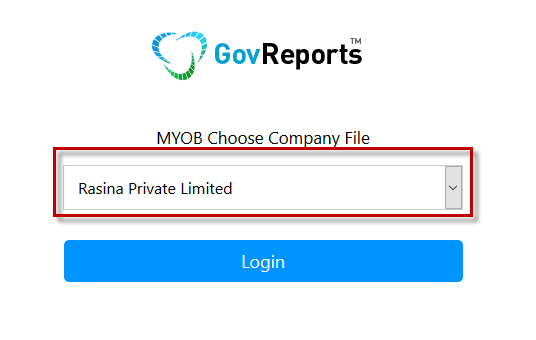
Select Organisation from the dropdown list and click “Login”.
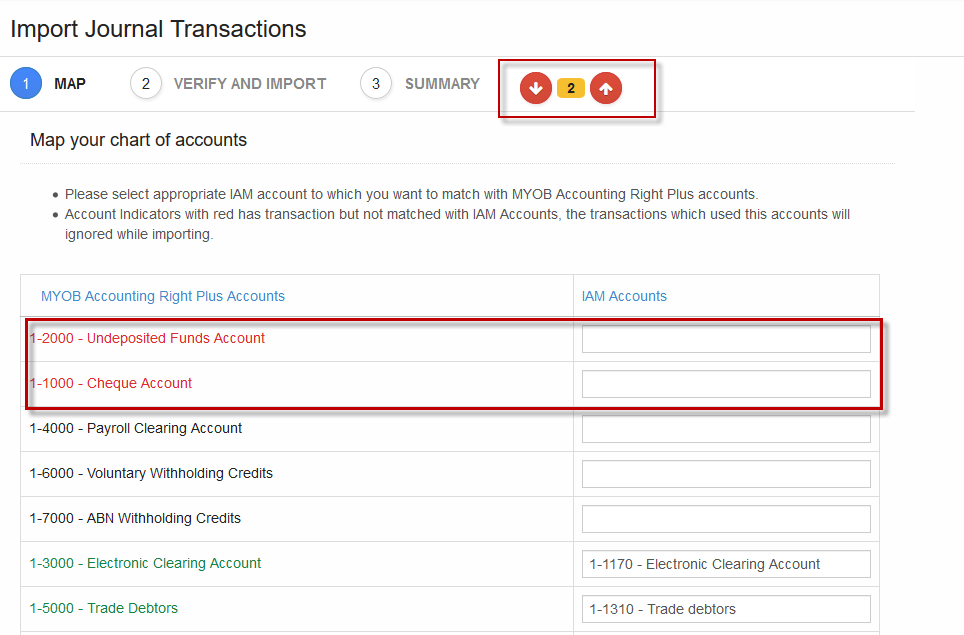
Initial chart of accounts setup to map list of accounts imported from MYOB and save for subsequent use..
Mandatory accounts in red and unmapped accounts count can be navigated through easily .
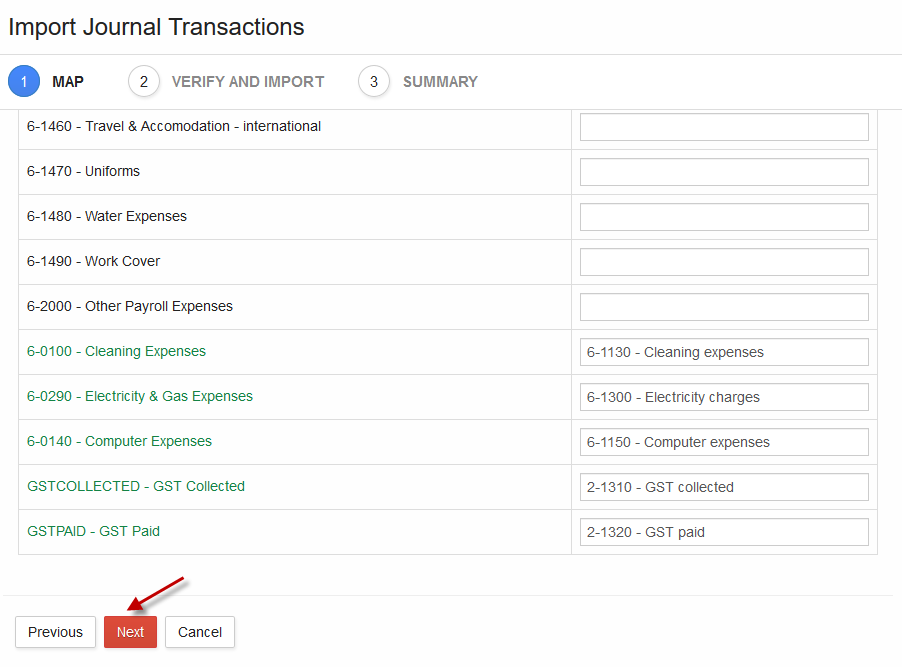
Click “Next” and select the chart of the account from the dropdown or set up a new account for mapping.
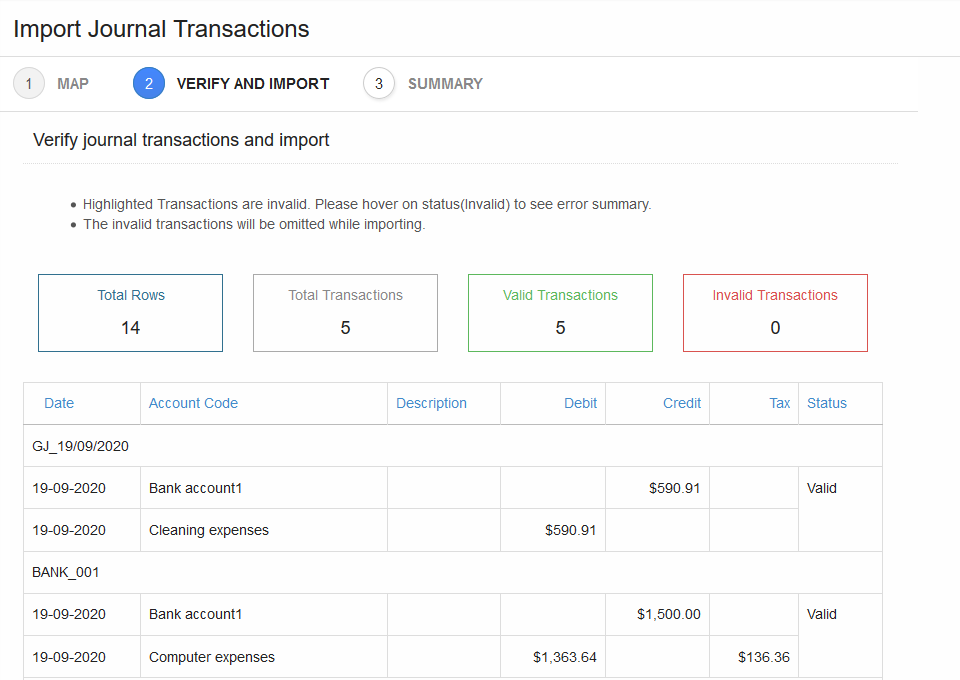
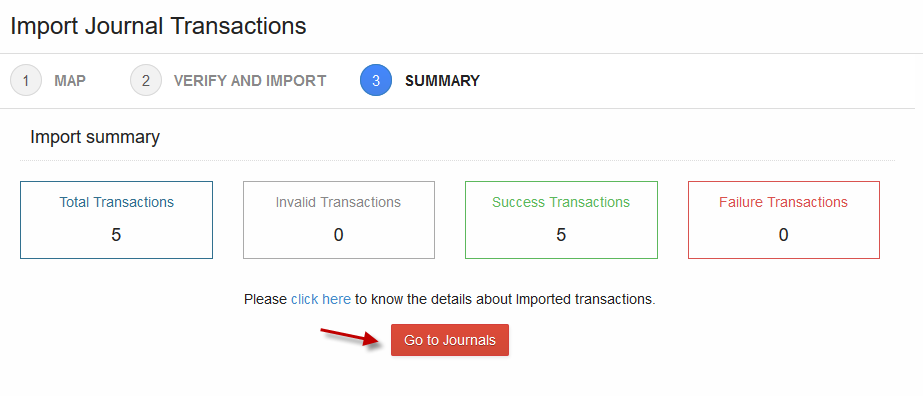
Review the imported data and click “Import”.
“Go to Journals” to view the imported transactions.
Any failed transactions review in the log file of imported summary and the reason for failure.
4. Import Trial Balance using Csv Files
Select “Import” menu.
Select “Upload Csv File”
Choose “Trial Balance”.

Select Accounting Software, COA Template from the dropdown.Choose “Download Sample File” and check the format before importing.
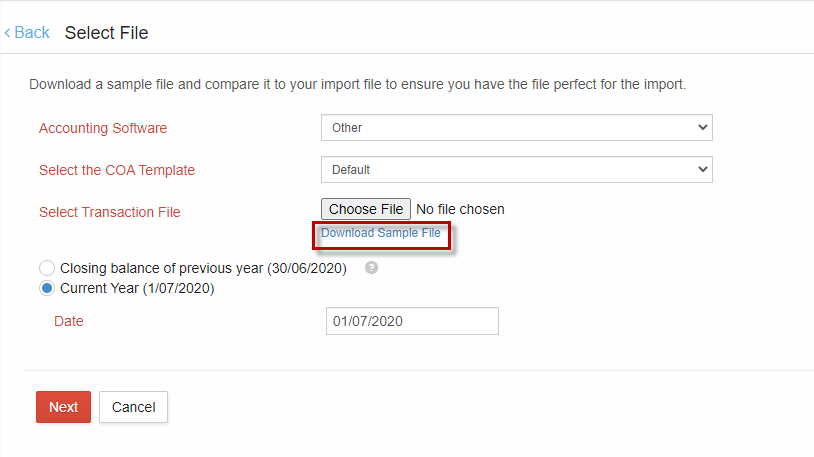
Upload the Csv file and click “Next”.

Initial chart of accounts set up requires mapping the list of accounts to be imported save for subsequent use.
Initial Chart of accounts setup requires mapping the list of accounts imported from QuickBooks and saved for subsequent use.
Mapping of chart of account from the dropdown or set up a new account
Map accounts and click “Next”.
Review details and Import.
View the summary and go to opening balances or accounting reports to review the imported data.
Any failed transactions will be listed from the log file of imported summary and the reason for failure.
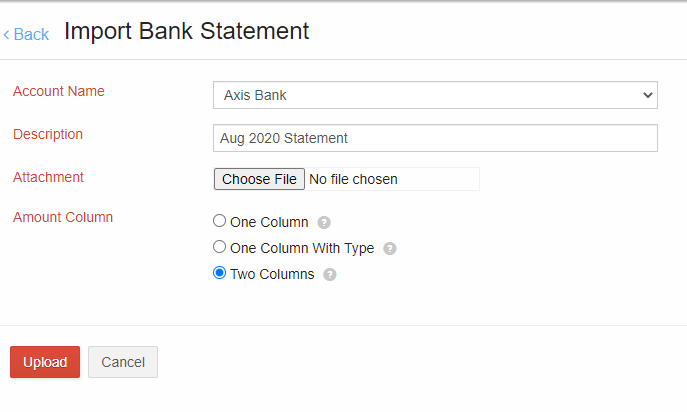
5. Import Bank Statements in Csv File Format
Bank Statements can be easily downloaded in CSV file format onto your computer.
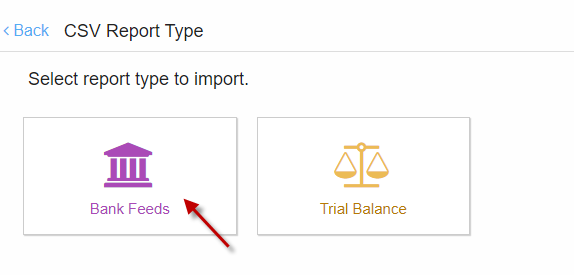
Select “Import”and choose “Upload Csv File”, then select “Bank Feeds” or alternatively go to the Banking menu and choose “Bank Feeds”.
Bank Statement in CSV Format Types:
1. Format with Negative Numbers for Debits
Example:
2. Format with Debit and Credit labels
Example:
3. Format with Columns for Debit and Credit Separately
Example:
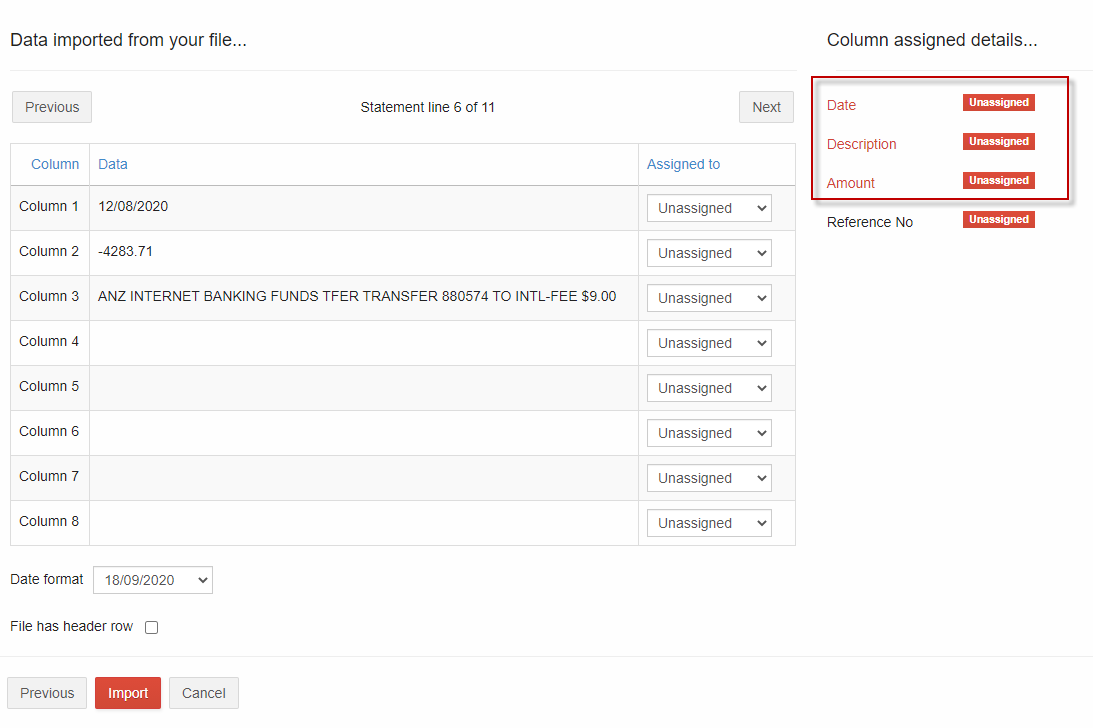
Step 1:
Select Bank account you want to import statements - > Upload Csv File - > select the appropriate format.

Step 2:
Mandatory fields will be highlighted to be assigned.
If the imported file has a header row, then tick File has header row - > Click Import to complete and redirect to Banking Transactions.

6. Import General Journal in Csv File Format
Step1:
Select “Import”and choose “Upload Csv File” or alternatively go to the Accounts menu and choose “General Journal”.
Select “General Journal”.
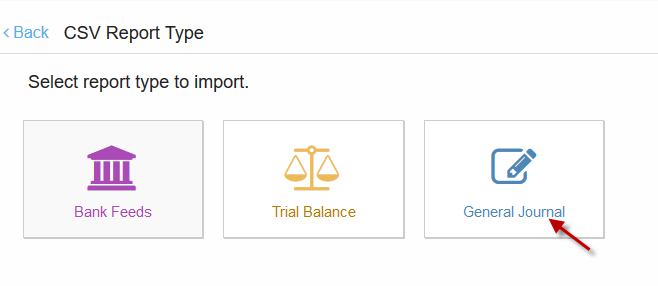
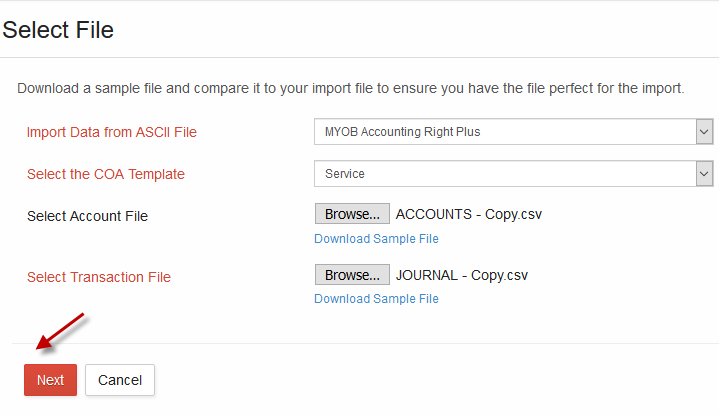
Select the type, template and upload Accounts and Transactions file, click Next
Initial chart of accounts set up with mapping for the list of accounts to be uploaded and saved for subsequent use.
Mandatory accounts in red to be mapped as chart of accounts and navigate through the unmapped accounts count to verify.

Click “Next” and select the chart of account from the dropdown menu or set up a new account for mapping.
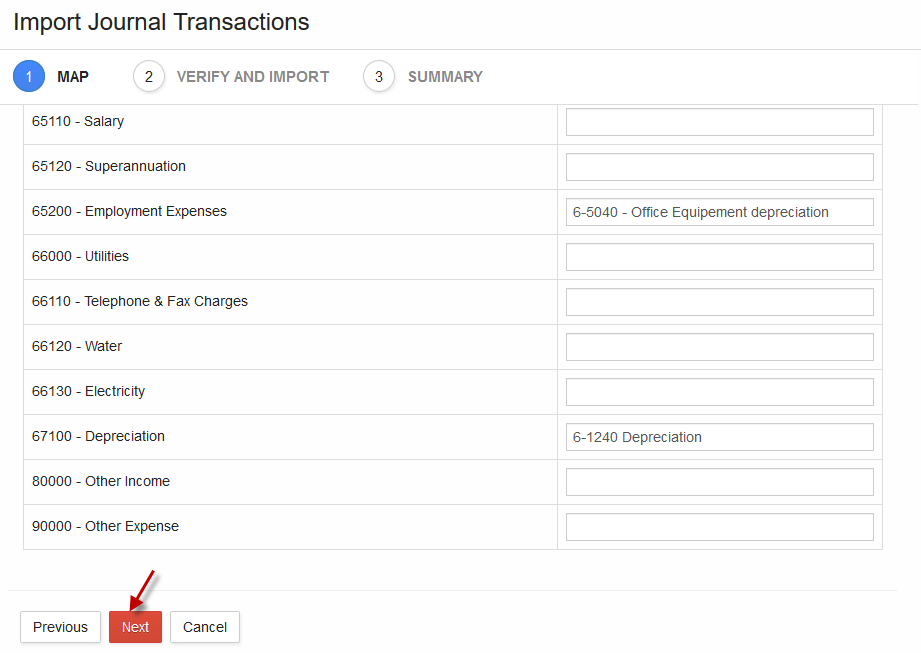
Review imported details and click Import.
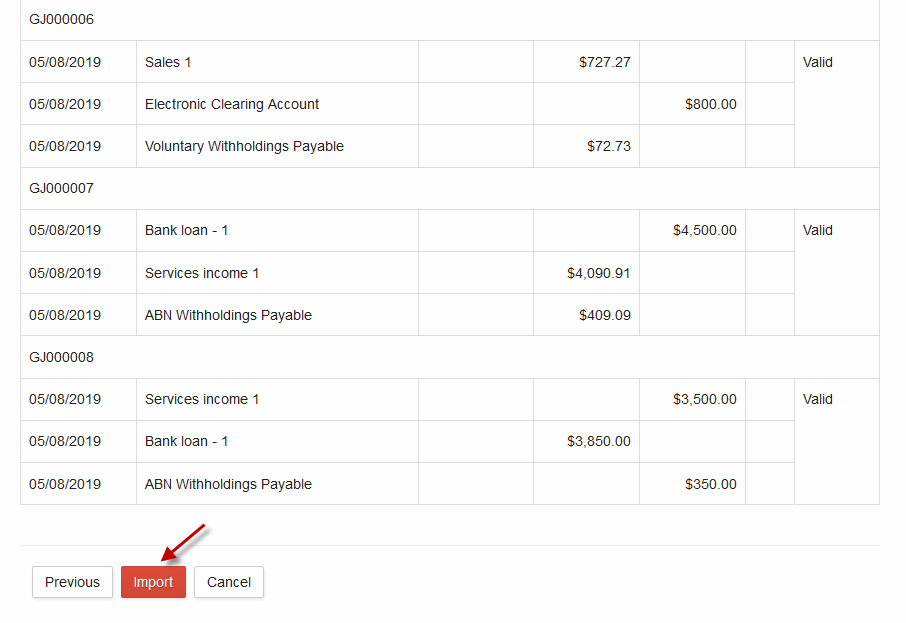
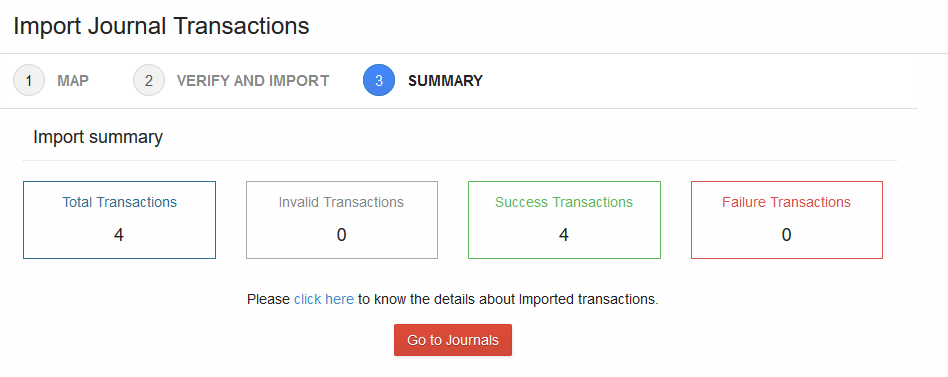
Go to Journals or accounting reports to review the data imported.
Any failed transactions will be listed in the log file of imported summary and reason for failure.
Import Financials from Other Software into IAM
Importing data is the quickest way to get your business started with IAM. GovReports is integrated with other accounting software including MYOB, Xero and QuickBooks to enable direct data import from these accounting software.
2 Options to get you started by either using the import function or manually upload CSV back up files.
What data can be imported from Other Software?
- Xero -> Import Trial Balance, Balance Sheet & Profit & Loss
- QuickBooks - > Import Trial Balance, Balance Sheet & Profit & Loss
- MYOB -> Import General Journal transactions
What data can be manually uploaded in Csv Files?
- Trial Balance
- Bank Statements
- General Journal Transactions
Data Import Function in IAM:
Step 1 : Select data source ie: Other accounting software or Upload Csv file.
Step 2 : Select software import or Upload of CSV
Step 3 : Set the Date and respective Criteria
Step 4 : Connect to selective accounting software or Upload Csv File
Step 5 : Map the chart of accounts
Step 6: Review and Import
1.Import data from Xero:
Select “Import” menu.
Click “Xero”
Select data source to import
Set Date and other matching criteria, “Connect to Xero”.
Enter credentials and log in to Xero.
Select Organisation and click “Allow access for 30 minutes”.
Initial chart of accounts set up with mapping of accounts list imported from Xero, mapped data will be saved automatically for subsequent use.
Mandatory accounts in red to be mapped as chart of accounts and unmapped accounts count will be displayed and easily navigated through.
Click “Next” and select the chart of account from the dropdown menu or set up a new account for mapping.
Review details and “Import”.
View the summary and go to opening balances or accounting reports to review the data imported.
Any failed transactions will be listed in the log file of imported summary and reason for failure.
2. Import data from QuickBooks:
Select “Import” menu
Select “QuickBooks”.
Select Date and other matching criteria & “Connect to QuickBooks”.
Enter credentials to Sign In to QuickBooks.
Initial chart of accounts set up with mapping list of accounts to be imported from Quickbooks. When completed, the mappings will be saved automatically for subsequent imports.
Mandatory accounts in red and unmapped accounts can easily be navigated through.
Click “Next” after mapping and select chart of the account from the dropdown or set up a new account for mapping.
Review details and Import.
View the summary and go to opening balances or accounting reports to review the imported data. Any failed transactions from the log file will be listed and the reason for failure.
3. Import General Journal from MYOB
Select “Import” menu
Select “MYOB”.
Select “General Journal”
Set the date and click “MYOB AccountRight”.
Select Organisation from the dropdown list and click “Login”.
Initial chart of accounts setup to map list of accounts imported from MYOB and save for subsequent use..
Mandatory accounts in red and unmapped accounts count can be navigated through easily .
Click “Next” and select the chart of the account from the dropdown or set up a new account for mapping.
Review the imported data and click “Import”.
“Go to Journals” to view the imported transactions.
Any failed transactions review in the log file of imported summary and the reason for failure.
4. Import Trial Balance using Csv Files
Select “Import” menu.
Select “Upload Csv File”
Choose “Trial Balance”.
Select Accounting Software, COA Template from the dropdown.Choose “Download Sample File” and check the format before importing.
Upload the Csv file and click “Next”.
Initial chart of accounts set up requires mapping the list of accounts to be imported save for subsequent use.
Initial Chart of accounts setup requires mapping the list of accounts imported from QuickBooks and saved for subsequent use.
Mapping of chart of account from the dropdown or set up a new account
Map accounts and click “Next”.
Review details and Import.
View the summary and go to opening balances or accounting reports to review the imported data.
Any failed transactions will be listed from the log file of imported summary and the reason for failure.
5. Import Bank Statements in Csv File Format
Bank Statements can be easily downloaded in CSV file format onto your computer.
Select “Import”and choose “Upload Csv File”, then select “Bank Feeds” or alternatively go to the Banking menu and choose “Bank Feeds”.
Bank Statement in CSV Format Types:
1. Format with Negative Numbers for Debits
Example:
| Date | Description | Amount |
| 01/09/2020 | ANZ INTERNET BANKING PAYMENT | -$50.82 |
| 14/09/2020 | TRANSFER FROM ATO ATO005000012842648 | $150 |
2. Format with Debit and Credit labels
Example:
| Date | Description | Type | Amount |
| 01/09/2020 | Cash | CR | $7360.50 |
| 14/09/2020 | TATA COMMUNICATIONS LTD | DR | $500 |
3. Format with Columns for Debit and Credit Separately
Example:
| Date | Description | Debit | Credit |
| 01/09/2020 | DEPOSIT ATO ATO003000013091295 | $7360.50 | |
| 14/09/2020 | MONTHLY PLAN FEE | $120.00 |
Step 1:
Select Bank account you want to import statements - > Upload Csv File - > select the appropriate format.
Step 2:
Mandatory fields will be highlighted to be assigned.
If the imported file has a header row, then tick File has header row - > Click Import to complete and redirect to Banking Transactions.
6. Import General Journal in Csv File Format
Step1:
Select “Import”and choose “Upload Csv File” or alternatively go to the Accounts menu and choose “General Journal”.
Select “General Journal”.
Select the type, template and upload Accounts and Transactions file, click Next
Initial chart of accounts set up with mapping for the list of accounts to be uploaded and saved for subsequent use.
Mandatory accounts in red to be mapped as chart of accounts and navigate through the unmapped accounts count to verify.
Click “Next” and select the chart of account from the dropdown menu or set up a new account for mapping.
Review imported details and click Import.
Go to Journals or accounting reports to review the data imported.
Any failed transactions will be listed in the log file of imported summary and reason for failure.